

Welcome to the sixth blog post in our “Kubeflow Fundamentals” series specifically designed for folks brand new to the Kubelfow project. The aim of the series is to walk you through a detailed introduction of Kubeflow, a deep-dive into the various components, add-ons and how they all come together to deliver a complete MLOps platform.
If you missed the previous installments in “Kubeflow Fundamentals” series, you can find them here:
- Part 1: An Introduction
- Part 2: Machine Learning Workflows
- Part 3: Distributions and Installations
- Part 4: External Add-Ons
- Part 5: Getting Started with Notebooks
In this post we’ll focus on getting a little more familiar with Jupyter notebooks and how we can leverage them within Kubeflow as part of our machine learning workflow. Ok, let’s dive right in!
What are Kubeflow Notebooks?
Kubeflow Notebooks provide a way to run web-based development environments inside a Kubernetes cluster. These Notebook servers run as containers inside a Kubernetes Pod.
Which development environment is available inside of Kubeflow (and which packages are installed) is determined by the Docker image used to invoke the Notebook server. Note that users can create notebook containers directly in the Kubeflow cluster, rather than having to configure everything locally on their laptops. Another benefit of this arrangement is that admins can provide standard notebook images for their organization with all the required packages pre-installed. There are plenty of stories in the data science community of it taking hours, days, even weeks to just get the notebook environment set up correctly with all the tools, libraries and dependencies sorted out. A final advantage is that access control can be managed by Kubeflow’s role-based access control capabilities. This enables easier and more secure notebook sharing across an organization.
What is JupyterLab?
Kubeflow Notebooks natively supports three types of IDEs:
- JupyterLab
- RStudio
- Visual Studio Code (code-server)
But technically, any web-based IDE should work! For the purposes of this post we are going to focus on the most popular Kubeflow option, JupyterLab.
JupyterLab is an open source, web-based environment for creating Jupyter notebook documents. The development environment is very useful in interactive data science and scientific computing projects across a variety of programming languages. Jupyter’s JSON documents follow a versioned schema, contain an ordered list of input/output cells, can contain code, text (via Markdown), math (via LaTex), plots and even rich media. One thing worth mentioning is that the term “notebook” term can often refer to the Jupyter web application, Jupyter Python web server, or the Jupyter document format, so pay attention to the context in which the term is being used!
For more information, check out: https://jupyter.org/
JupyterLab in Kubeflow
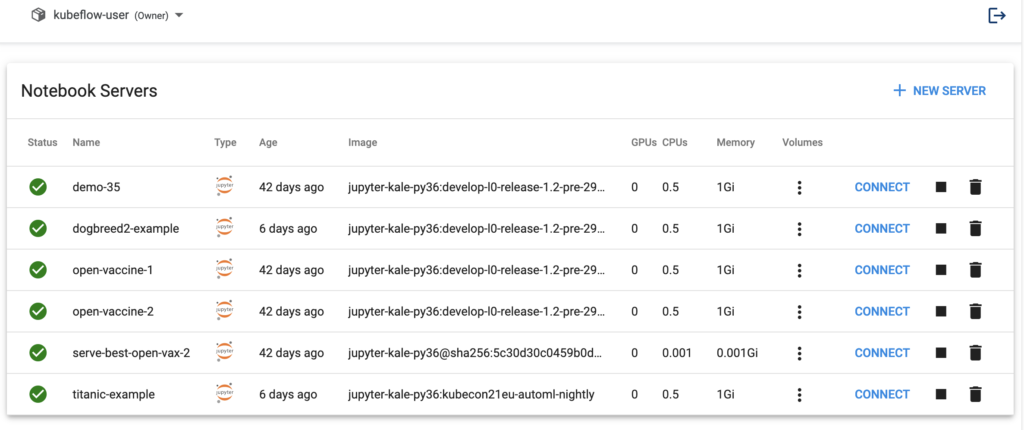
The Kubeflow Notebooks Web App enables you to easily spin up JupyterLab Notebook Servers. These servers can contain multiple Jupyter Notebooks, but it is more common to have a 1:1 mapping between notebook and server.
In the next several sections, let’s get familiar with JupyterLab’s basic features.
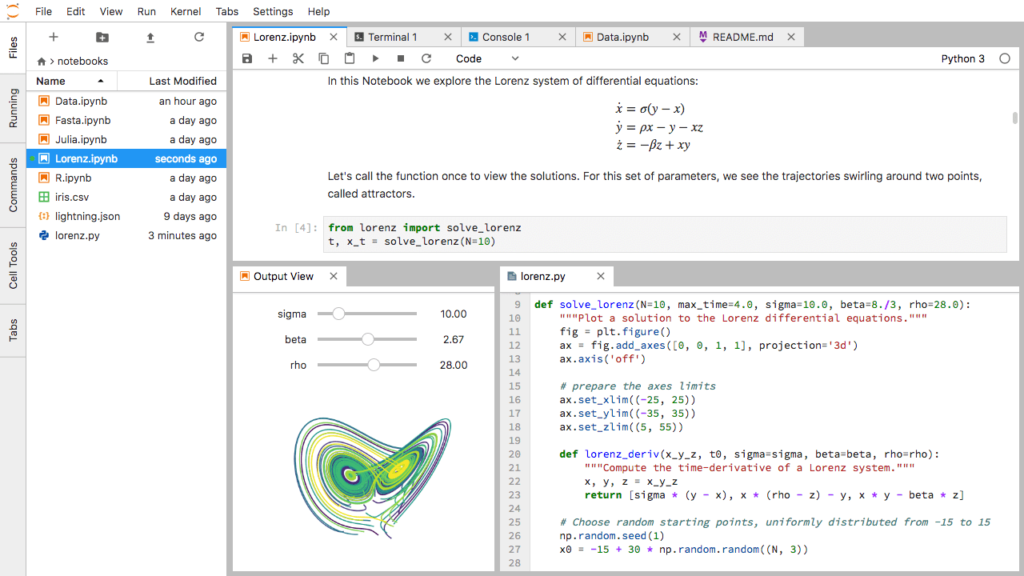
The JupyterLab user interface
The JupyterLab UI consists of a main work area containing:
- Tabs of documents and activities
- A collapsible left sidebar, and a menu bar
- A left sidebar containing a file browser
- A list of running kernels and terminals
- The command palette
- The notebook cell tools inspector
- A tabs list
JupyterLab URLs
*.ipynb is the extension commonly used for Jupyter Notebooks. URLs are used to open specific notebooks or files, but can also be used to manage workspaces. You can also combine file paths and workspaces in a single URL so it opens a specific file in a specific workspace. For example:
http(s)://<server:port>/<lab-location>/lab/tree/path/to/notebook.ipynbDocuments and Kernels
In JupyterLabs, “kernels” are separate processes started by the server that run your code in different programming languages and environments. JupyterLab enables you to connect any open text file to a code console and kernel. This means you can easily run code from the text file in the kernel interactively. Once the code console is open, send a single line of code or select a block of code and send it to the code console by hitting Shift + Enter.
JupyterLab Terminals
JupyterLab terminals support system shells like bash, tsch, etc. on Mac/Linux and PowerShell on Windows. You can run anything in your terminal, including programs such as vim or emacs. Note that terminals run on the system where the Jupyter server is running, with the privileges of that user. Note: If JupyterLab is installed on your local machine, the JupyterLab terminals will run there.
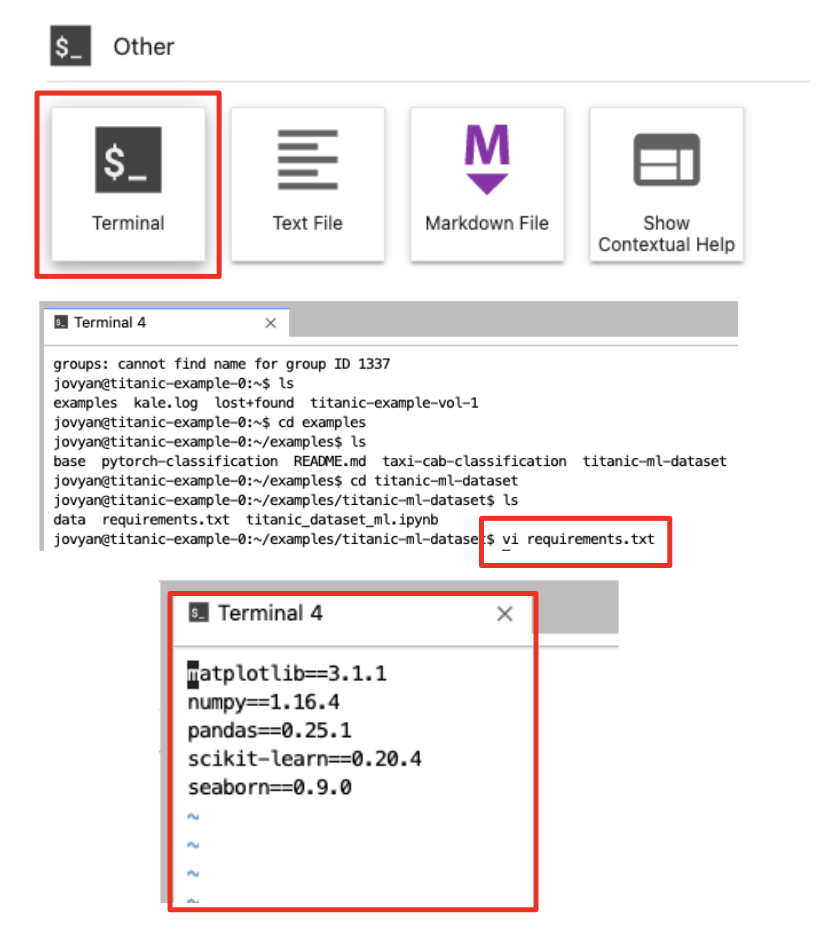
To launch a terminal, do the following:
- File > New Launcher
- Click on “Terminal”
JupyterLab Notebooks
Recall from a previous post that Jupyter Notebooks are JSON documents that follow a versioned schema, contain an ordered list of input/output cells, can contain code, text (Markdown), math (LaTex), plots and rich media.
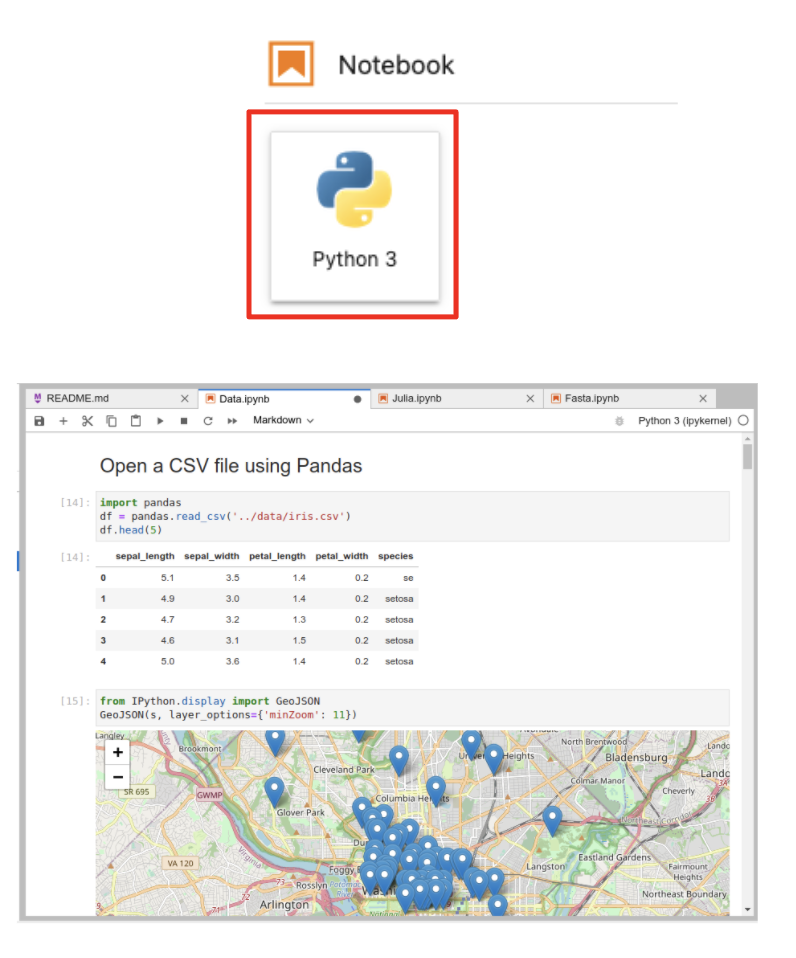
In order to launch a new Notebook, do the following:
- File > New Launcher
- Click on Notebook “Python 3”
JupyterLab Code Consoles
In JupyterLab, code consoles allow us to run code interactively in a kernel, for example Python. The cells of a code console show the order in which code was executed in the kernel, as opposed to the explicit ordering of cells in a notebook document. Code consoles also display rich output, just like notebook cells. In the example below we show a simple “Hello, world!” example using a code console.
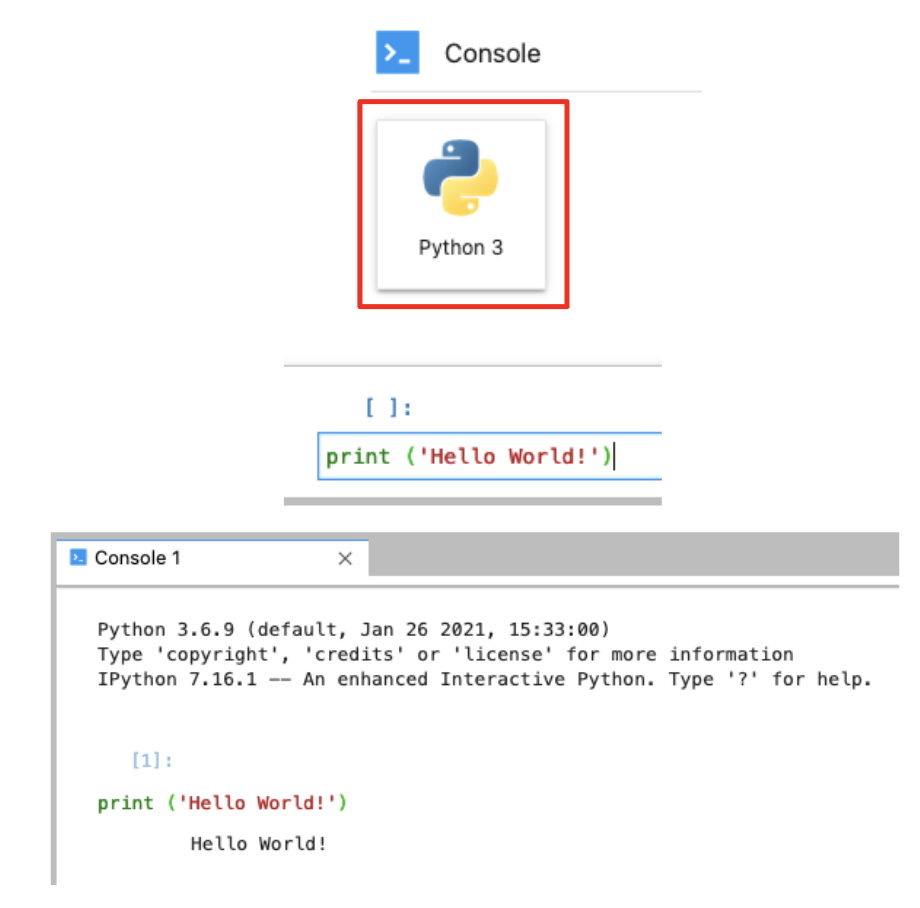
To invoke a new code console, do the following.
- File > New Launcher
- Click on Console “Python 3”
- Click Shift+Enter to run the code
JupyterLab Text Editor
The built-in text editor Includes syntax highlighting, configurable indentation (tabs or spaces), key maps and basic theming. To modify these settings simply navigate to the Settings menu. To edit an existing text file, all you have to do is double-click on its name in the file browser or drag it into the main work area.
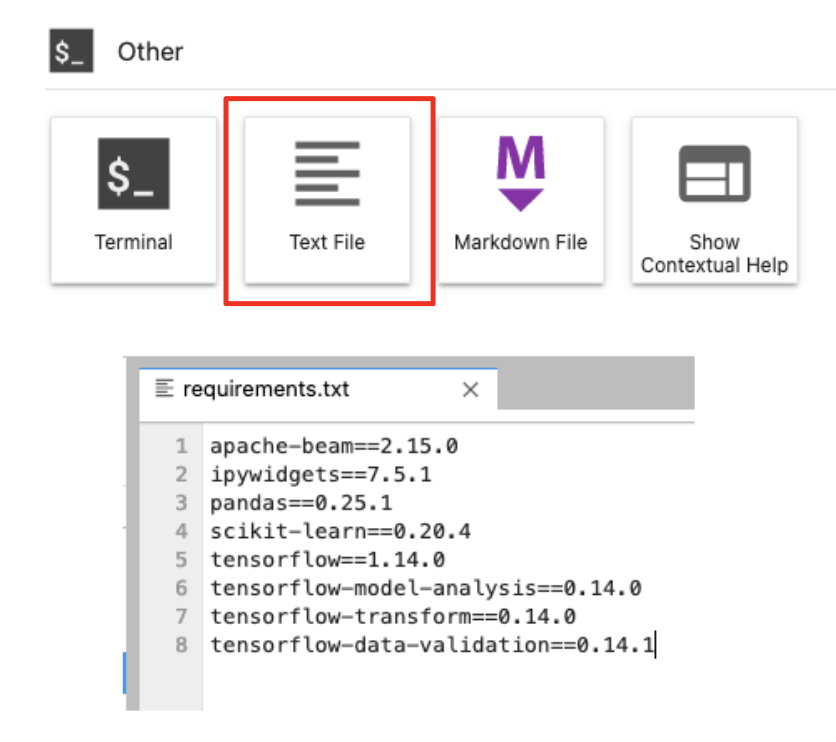
To launch a new text editor do the following:
- File > New Launcher
- Click on Other “Text File”
JupyterLab Extensions
JupyterLab is an extensible environment by design. This makes it easy to add (or build) extensions that deliver new themes, file viewers and editors, or renderers for rich outputs in notebooks. Extensions can also add items to the menu or command palette, keyboard shortcuts, or settings in the settings system. Finally, extensions can provide an API for other extensions to use and can depend on other extensions. For example, Kale is a JupyterLab extension that ships by default with the MiniKF packaged distribution on Kubeflow.
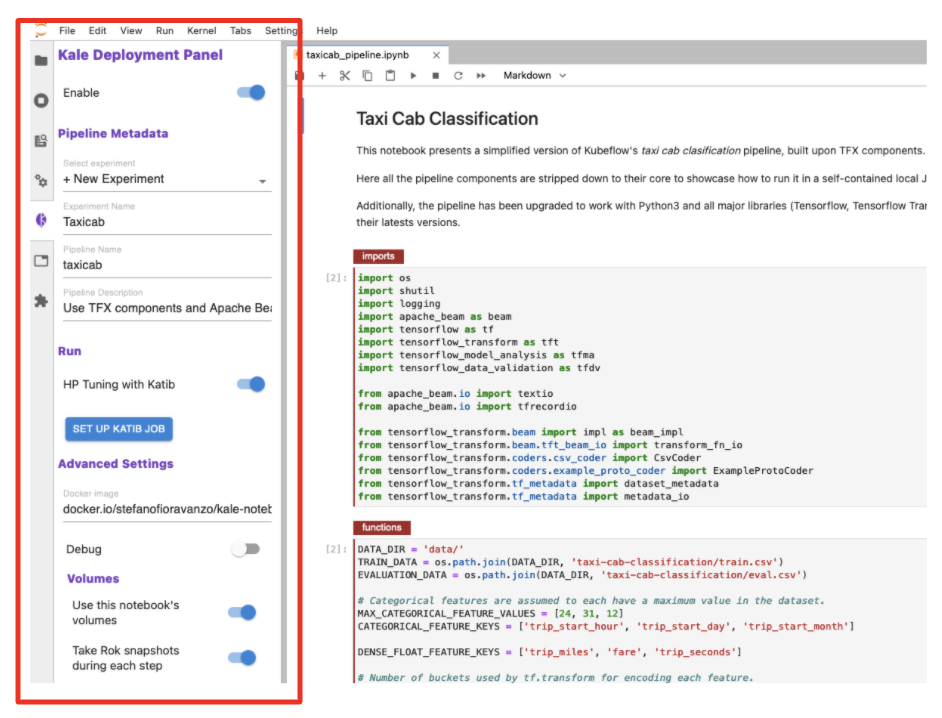
The Kale JupyterLab Extension
As mentioned, Kale is an example of a JupyterLab extension. It builds off the Notebook to provide the following additional functionality:
With Kale you annotate “cells” within Jupyter Notebooks to define:
- Pipeline steps
- Hyperparameter tuning
- GPU usage
- Metrics tracking
And with the ”click of a button” you can:
- Create pipeline components and KFP DSL
- Resolve dependencies
- Inject data objects into each step
- Deploy the data science pipeline
- Serve the best model
To learn more about kale, check out the Kale project page.
Exporting JupyterLab Notebooks
The final piece of functionality to cover is JupyterLab’s ability to export your Jupyter Notebook files (.ipynb) into other file formats.
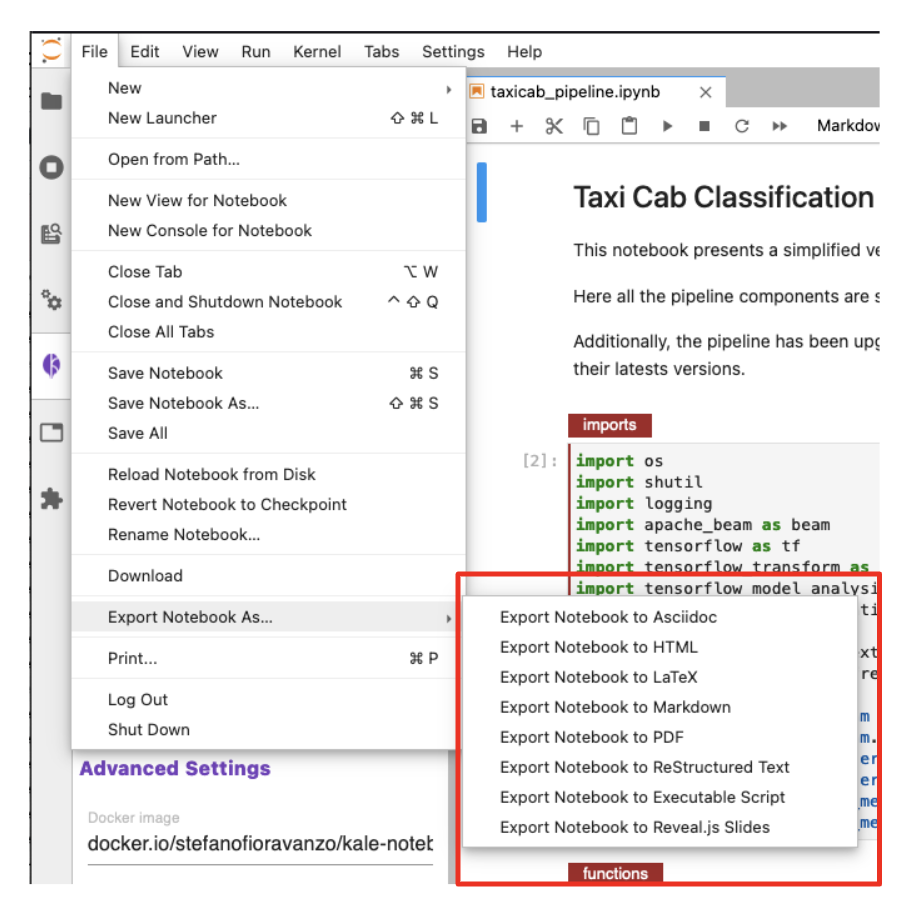
To perform an export, do the following:
- File > Export Notebook As
You should then see all the available formats.
Book a FREE Kubeflow and MLOps workshop
This FREE virtual workshop is designed with data scientists, machine learning developers, DevOps engineers and infrastructure operators in mind. The workshop covers basic and advanced topics related to Kubeflow, MiniKF, Rok, Katib and KFServing. In the workshop you’ll gain a solid understanding of how these components can work together to help you bring machine learning models to production faster. Click to schedule a workshop for your team.
About Arrikto
At Arrikto, we are active members of the Kubeflow community having made significant contributions to the latest 1.4 release. Our projects/products include:
- Kubeflow as a Service is the easiest way to get started with Kubeflow in minutes! It comes with a Free 7-day trial (no credit card required).
- Enterprise Kubeflow (EKF) is a complete machine learning operations platform that simplifies, accelerates, and secures the machine learning model development life cycle with Kubeflow.
- Rok is a data management solution for Kubeflow. Rok’s built-in Kubeflow integration simplifies operations and increases performance, while enabling data versioning, packaging, and secure sharing across teams and cloud boundaries.
- Kale, a workflow tool for Kubeflow, which orchestrates all of Kubeflow’s components seamlessly.