

Welcome to the latest installment of Arrikto’s ongoing series of blog posts that demonstrate how to take popular Kaggle competitions and convert them into Kubeflow Pipelines. All the converted Kaggle competitions in the series are contributed to the open source Kubeflow project for others to use and distribute. If you are interested in making a similar contribution, learn more.
Wait, What’s Kubeflow?
Kubeflow is an open source, cloud-native MLOps platform originally developed by Google that aims to provide all the tooling that both data scientists and machine learning engineers need to run workflows in production. Features include model development, training, serving, AutoML, monitoring and artifact management. The latest 1.5 release features contributions from Google, Arrikto, IBM, Twitter and Rakuten. Want to try it for yourself? You can get started in minutes with a free trial of Kubeflow as a Service, no credit card required.
About the Digit Recognizer Kaggle Competition
One of the earliest computer vision examples machine learning engineers encounter is Kaggle’s Digit Recognizer competition. It’s a competition aimed at improving the ability for computers to detect human handwritten numbers.
MNIST (Modified National Institute of Standards and Technology) is the de facto “hello world” dataset of computer vision. Since its release in 1999, this classic dataset of handwritten images has served as the basis for benchmarking classification algorithms. As new machine learning techniques emerge, MNIST remains a reliable resource for researchers and learners alike.
In this competition, your goal is to correctly identify digits from a dataset of tens of thousands of handwritten images.
In this blog, we will show how to run Kaggle’s Digit Recognizer competition on Kubeflow using the Kubeflow Pipeline SDK and the Kale JupyterLab extension.
You can find the data, files and notebook for this example on GitHub here.
If you’d like to sit through an instructor-led workshop based on this Kaggle competition, you can register here.
Prerequisites for Building the Kubeflow Pipeline
Deploy Kubeflow
If you don’t already have Kubeflow up and running, we recommend signing up for a free trial of Kubeflow as a Service. It’s the fastest way to get Kubeflow deployed without having to have any special knowledge about Kubernetes or use a credit card.
Launch a Notebook server
From the Notebooks UI inside of Kubeflow launch a new Notebook Server and open up a terminal session.
Clone the Repo
Clone the kubeflow/examples GitHub repo
git clone https://github.com/kubeflow/examples
Building the Kubeflow Pipeline
- Navigate to the
examples/digit/recognition-kaggle-competitiondirectory - Open the
digit-recognizer-kfp.ipynbnotebook
Step 1: Install the Kubeflow Pipeline SDK
First, we are going to install the latest version of pip and kfp in our notebook instance. This line of code should be executed in your notebook server’s terminal.
pip install --user --upgrade pip
pip install kfp --upgrade --user --quiet
Versions installed:
pip version: 21.3.1
kfp version: 1.8.11
After installing the KFP SDK, restart the notebook kernel.
To view the installed versions, execute:
pip show kfp
Step 2: Import the Necessary Kubeflow Pipeline Libraries
Next, we will import all the modules we will need to build the Kubeflow pipeline for handwritten digit recognition.
import kfp
import kfp.components as comp
import kfp.dsl as dsl
from kfp.components import InputPath, OutputPath
from typing import NamedTuple
- The
kfp.componentsmethod is used to create and modify pipeline components InputPathandOutputPathhelp to define the input & output paths between pipeline components
Step 3: Create the Pipeline Component Python Functions
Next, we will write a Python function to do a specific machine learning task, such as downloading data, data loading and/or data preprocessing.
Download the Data
First, the compressed data is obtained from Kaggle and saved in a GitHub repository. The raw file link is copied and given in a format similar to:
https://github.com/josepholaide/examples/tree/master/digit-recognition-kaggle-competition/data/{file}.csv.zip?raw=true
…where file is either train or test.
The download data function takes a download link in the above format as input and extracts the compressed file to the output path given.
The subprocess.run command helps to install dependencies or libraries not present in the component.
Load the Data
After downloading the data, the next thing to do is to load the data into a pandas DataFrame.
The load_data function takes the download data path as an argument, combines the train and test data for effective coding and outputs the result to the given output path.
Preprocess Data
In this next step we need to transform the data.
The preprocess_data function takes the load_data_path as input, transforms the data and passes the transformed data to the specified output path.
Model Training
The modeling function accepts the preprocess_data_path as input, trains a multi-class classifier using the given input and saves the trained model to the output path specified.
Evaluation and Prediction
The prediction function accepts the model_path as input, loads the saved model, predicts on the validation data and creates a confusion matrix visualization.
The confusion matrix metadata is available to the Kubeflow Pipelines UI. Metadata can automatically be visualized with the output viewer(s) in pipelines. To learn more about creating visualization in the Pipelines UI, click here.
Step 4: Kubeflow Pipeline Component Creation
Kubeflow Pipeline components are self-contained sets of code that execute one of the steps in the machine learning workflow, such as data ingestion or model training. They create the computation required to complete a step in your machine learning workflow.
Below are the main parts of a component definition:
- Metadata: Name, description and other metadata.
- Interface (inputs and outputs): Name, type, default value.
- Implementation: How to run the component, given the input arguments.
Components are usually serialized to a file in YAML format for sharing.
Using the kfp.components.create_component_from_func method, we can easily create components from Python functions. This generates the YAML file and creates the component for us.
The method create_component_from_func has the following arguments:
-
func:Python function created.output_component_file:name of YAML file to be created. It saves the component specification as a YAML file for future use. This argument is optional.base_image:the Docker image to run the component on.packages_to_install:pip libraries to be installed. This is optional.
Step 5: Kubeflow Pipeline Function Creation
A pipeline is a description of a machine learning workflow, it is made up of connected components that make up the steps in the workflow and how the components interact with each other.
The kfp.dsl method is used to define and interact with pipelines and components. To create a pipeline function, the dsl.pipeline decorator is used. This decorator returns a pipeline object.
The pipeline function takes in all the arguments in the different components as arguments. From download_link in the download_data component to model_path in the prediction component.
Let’s create a Digit Recognizer Kubeflow Pipeline function.
download_opis the first step in the pipeline workflow. It accepts the download link as input and outputs the downloaded data to the output path specified.load_opaccepts the output path of the download path as input, loads the data in the download path and stores the data in the load data path as output.load_opdepends ondownload_op.output.preprocess_optakes the output of theload_opcomponent as input, transforms the data and saves it in the preprocess data path as output.modeling_opaccepts thepreprocess_opoutput as input, trains a convolution neural network on it and saves the trained model in the model training path as output.
predict_op accepts both the modeling_op and preprocess_op outputs as input, carries out model evaluation on it and stores the metrics output in the given metrics path for the Kubeflow Pipeline UI to visualize.
Step 6: Compiling and Submitting the Kubeflow Pipeline
The final step of the pipeline creation process is the pipeline compilation and the competition submission.
With the help of kfp.Client.create_run_from_pipeline_func method, we are able to compile the digit_recognizer_pipeline function and submit it for execution on Kubeflow Pipelines.
The method create_run_from_pipeline_func has the following arguments:
-
pipeline_func:pipeline function nameexperiment_name:pipeline experiment namerun_name:pipeline run namearguments:pipeline function arguments
Let’s compile and submit the pipeline:
We can view the run details immediately after submitting the pipeline.
Is There an Easier Way to Create a Kubeflow Pipeline?
You bet! If you want to automate most of the steps illustrated in the previous example, then we recommend making use of the open source JupyterLab extension called Kale. Kale is built right into Kubeflow as Service and provides a simple UI for defining Kubeflow Pipelines directly from your JupyterLab notebook, without the need to change a single line of code, build and push Docker images, create KFP components, or write KFP DSL code to define the pipeline DAG. In this next example, we’ll show you just how easy it is.
Prerequisites for Building the Kubeflow Pipeline using Kale
Launch a Notebook server
From the Notebooks UI inside of Kubeflow launch a new Notebook Server and open up a terminal session.
Clone the Repo
- Clone the kubeflow/examples GitHub repo
git clone https://github.com/kubeflow/examples
- Navigate to the examples/digit/recognition-kaggle-competition directory
- Open the digit-recognizer-kale.ipynb notebook
Understanding Kale Tags
With Kale you annotate cells (which are logical groupings of code) inside your Jupyter Notebook with tags. These tags tell Kuebflow how to interpret the code contained in the cell, what dependencies exist and what functionality is required to execute the cell.
Step 1: Annotate the Notebook with Kale Tags
Enable the Kale Deployment Panel
Next, we are going to enable Kale from the deployment panel.
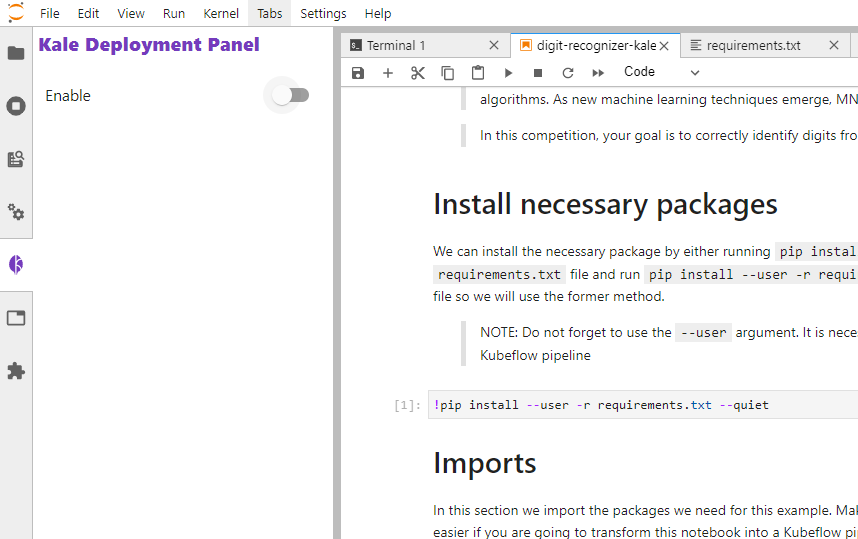
Install the Necessary Python Packages
Next, we need to install the necessary Python packages to run the digit recognizer notebook. We will do that by either running pip install --user <package_name> or including everything in a requirements.txt file and run pip install --user -r requirements.txt in our running notebook instance. Since we have put the dependencies in a requirements.txt file, we will use the second method.
Below are the packages installed for this workflow:
pandas
seaborn
tensorflow==2.3.0
wget
After installing the python packages, restart the notebook kernel before proceeding
Annotate Notebook Cells with Kale Tags
After installing the required Python packages, the next step is to annotate the notebook with Kale tags.
The “Skip Cell” annotation can be used to skip any section of the notebook that is not required for the pipeline compilation. There is no need to feed this cell into our pipeline step because the packages have already been installed in the notebook.

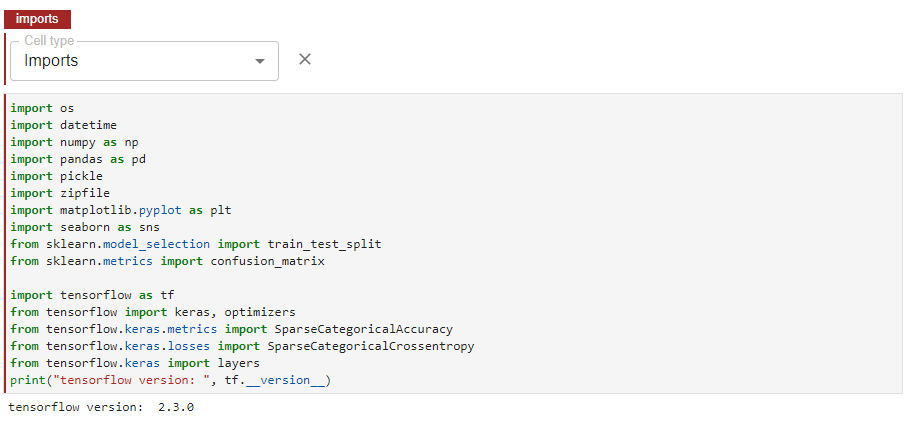
We import the necessary packages for this example in this cell. Ensure that all your imports are contained in a single cell. It will make your life easier if you are going to transform this notebook into a Kubeflow pipeline using Kale. Here the “imports” tag is used.
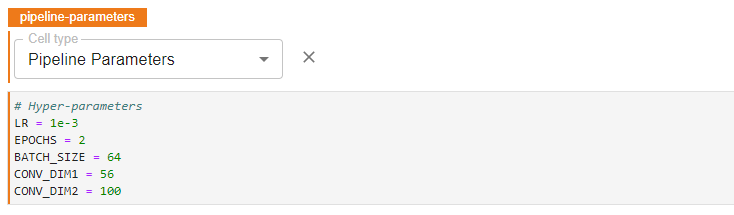
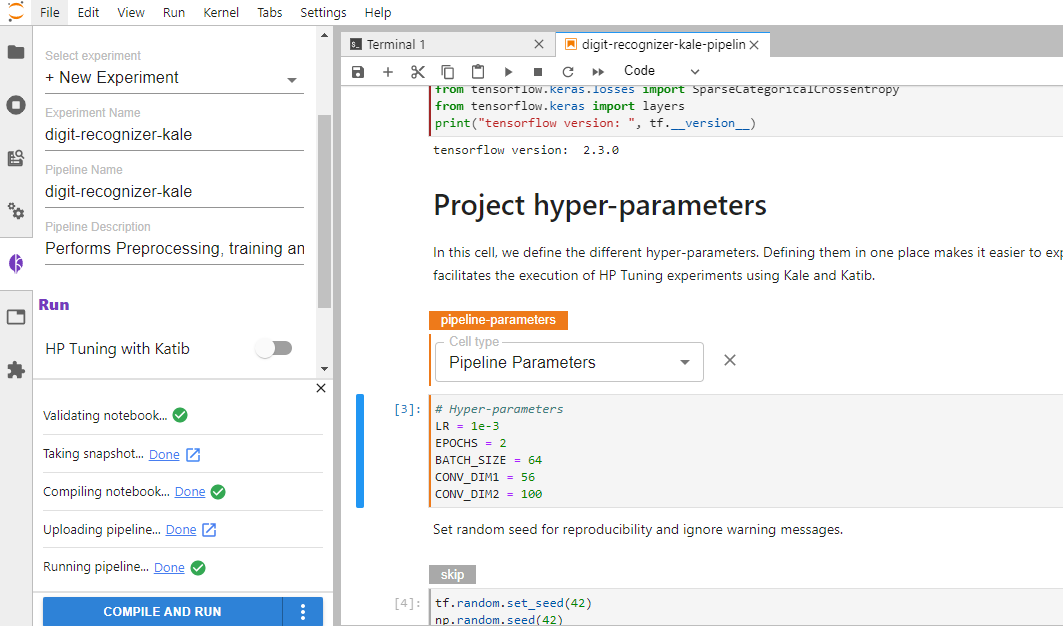
The “Pipeline Parameters” tag is required for defining pipeline parameters and for running Hyperparameter Tuning experiments with Kale and Katib. The parameters are passed to pipeline steps that make use of them.
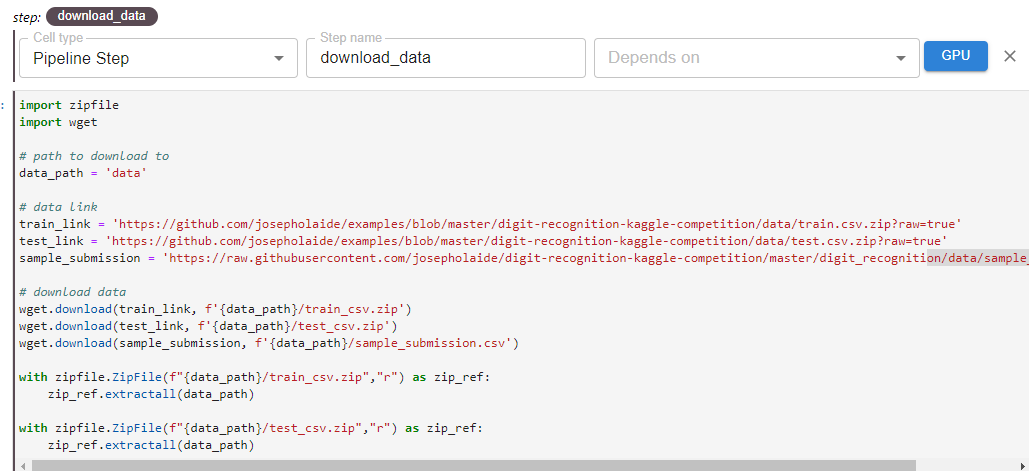
In this cell, the “Pipeline Step” annotation is used. The pipeline step is a set of code that implements the computation required to complete a step in your machine learning workflow. This tag is used to define the download data step. Because this is the first step in the pipeline, it has no dependencies. Also, each pipeline step can have its own GPU support, however for this task it is not enabled.
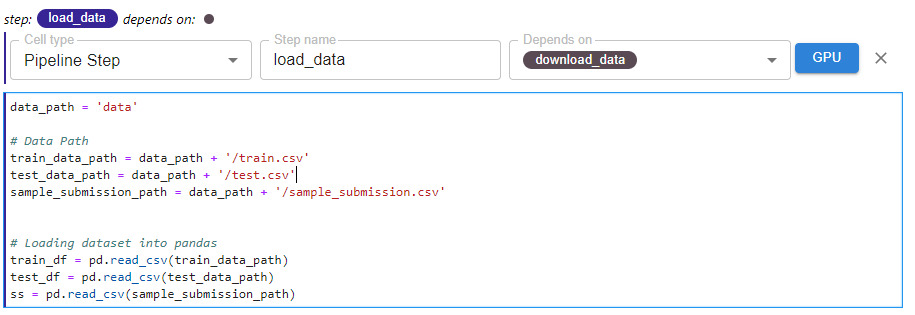
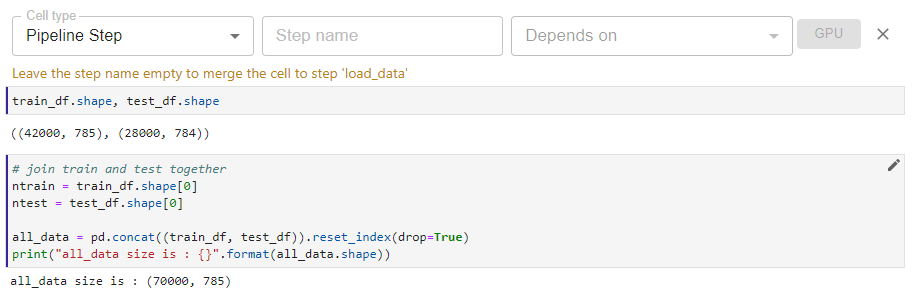
In this cell, we define the load_data step using the “Pipeline Step” tag. This step depends on the previous download_data step. As demonstrated below with the load data step, multiple cells may be combined into a single pipeline step.
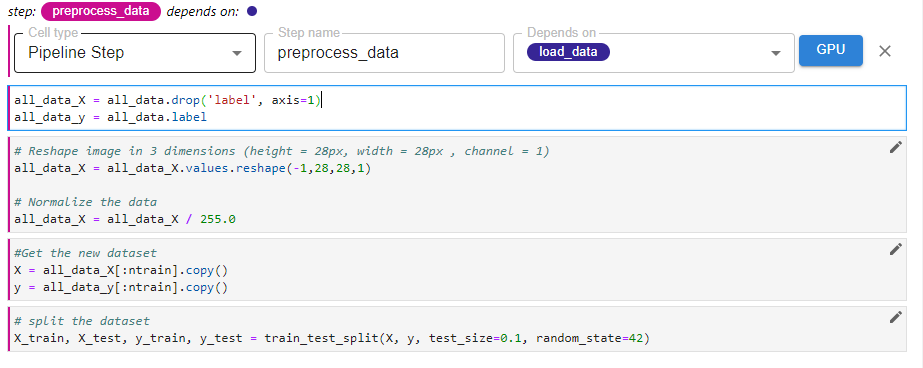
In this cell, we define the preprocess_data step using the “Pipeline Step” tag. This step depends on the previous load_data step.
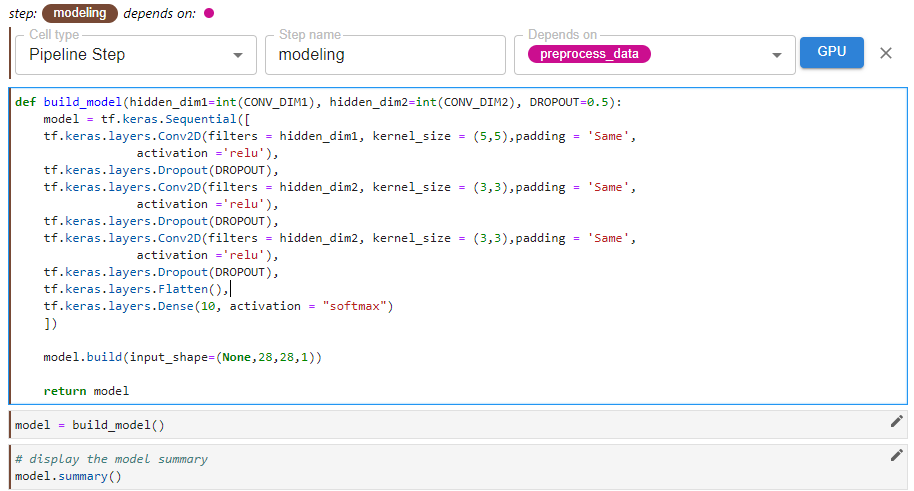
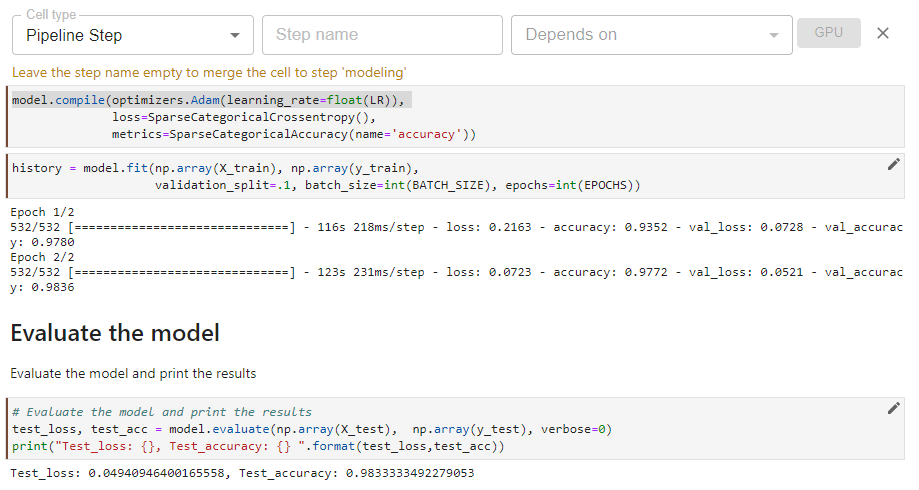
In this cell, we define the modeling step using the “Pipeline Step” tag. This step depends on the previous preprocess_data step. Here, multiple cells were combined into a single pipeline step.
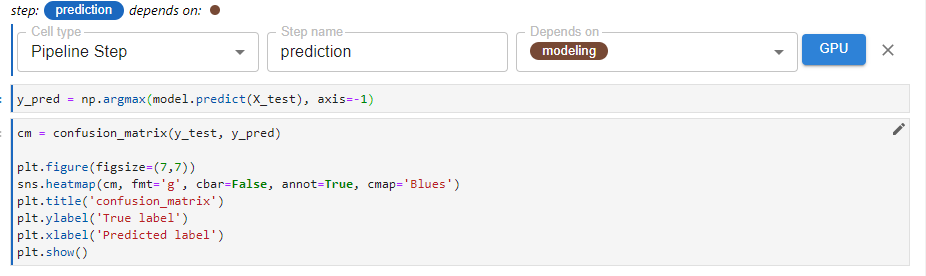
In this final cell, we define the final step, the prediction step using the “Pipeline Step” tag. This step depends on the previous modeling step. This step also generates a confusion matrix as a visualization in the Kubeflow Pipeline UI.
Step 2: Run the Kubeflow Pipeline
Once you’ve tagged your notebook, click on the “Compile and Run” button in the Kale widget. Kale will perform the following tasks for you:
- Validate the notebook
- Take a snapshot, so the whole environment is versioned
- Compile the notebook to a Kubeflow pipeline
- Upload the pipeline
- Run the pipeline
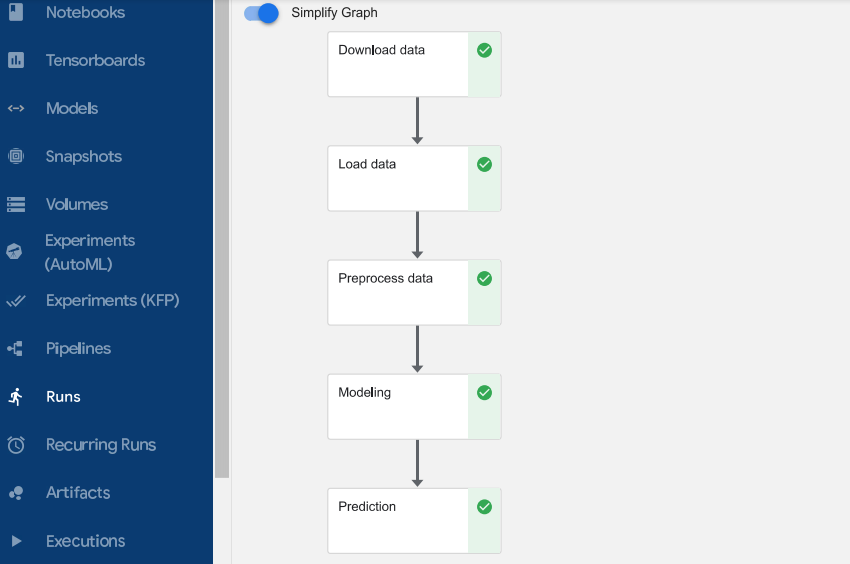
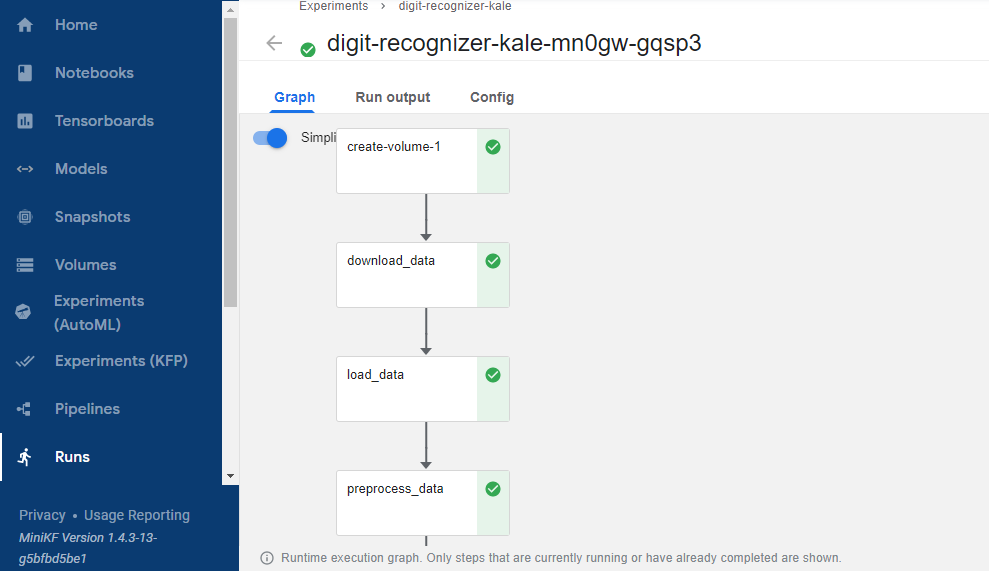
In the “Running pipeline” output, click on the “View” hyperlink. This will take you directly to the runtime execution graph where you can watch your pipeline execute and update in real time.
That’s it! You now have Kaggle’s Digit Recognizer competition running as a reproducible Kubeflow Pipeline with less coding and steps thanks to Kale.
By using Kale we eliminated the following from the previous example:
- Repetitive installation of Python packages after every pipeline component creation. In Kale, all the necessary packages are installed at once.
- Slow pipeline creation: It takes more time to create a pipeline by hand vs taking advantage of Kale’s pipeline automation capabilities.
- Lots of boilerplate code and code restructuring: Without Kale, the notebook has to be entirely modified to be compatible with the kfp SDK, which results in having to write yet more boilerplate code. With Kale, the original notebook is simply annotated with Kale tags.
- The difficulty of visualizing Pipelines: To produce metrics visualization, specific standards and processes must be followed. With Kale, the visualizations are created the same conventional way we create visualizations in our notebooks.
What’s Next?
- Get started with Kubeflow in just minutes, for free. No credit card required!
- Get the code, data, and notebooks used in this example
- Try your hand at converting a Kaggle competition into a Kubeflow Pipeline