

Welcome to the latest installment of Arrikto’s ongoing series of blog posts that demonstrate how to take popular Kaggle competitions and convert them into Kubeflow Pipelines. All the converted Kaggle competitions in the series are contributed to the Kubeflow project for others to use and distribute.
Wait, What’s Kubeflow?
Kubeflow is an open source, cloud-native MLOps platform originally developed by Google that aims to provide all the tooling that both data scientists and machine learning engineers need. Features include model development, training, serving, AutoML, monitoring, artifact management and experiment tracking. The latest 1.5 release features contributions from Google, Arrikto, IBM, Twitter and Rakuten. Want to try it for yourself? Get started in minutes with a free trial of Kubeflow as a Service, no credit card required.
About the NLP with Disaster Tweets Competition
Here’s the competition description from the Kaggle website:
“Twitter has become an important communication channel in times of emergency.
The ubiquitousness of smartphones enables people to announce an emergency they’re observing in real time. Because of this, more agencies are interested in programatically monitoring Twitter (i.e. disaster relief organizations and news agencies).
But, it’s not always clear whether a person’s words are actually announcing a disaster. For example:

The author explicitly uses the word “ABLAZE” but means it metaphorically. This is clear to a human right away, especially with the visual aid. But it’s less clear to a machine.
In this competition, you’re challenged to build a machine learning model that predicts which Tweets are about real disasters and which one’s aren’t. You’ll have access to a dataset of 10,000 tweets that were hand classified. If this is your first time working on an NLP problem, we’ve created a quick tutorial to get you up and running.
Disclaimer: The dataset for this competition contains text that may be considered profane, vulgar, or offensive.
Acknowledgments
This dataset was created by the company figure-eight and originally shared on their
‘Data For Everyone’ website here.“
You can download all the code, notebooks and data used in this Kaggle competition on GitHub.
Prerequisites for Building the Kubeflow Pipeline
Kubeflow
If you don’t already have Kubeflow up and running, we recommend signing up for a free trial of Kubeflow as a Service.
Pipeline Development
Skills that will be helpful:
- Python basics, including working with pickle files
- Familiarity with pandas and NLP libraries such as NLTK, regex, strings, tqdm, TensorFlow and Keras functions
- Data preprocessing for NLP models, tokenizers and pad sequences
Building the Kubeflow Pipeline
The steps for creating a Kubeflow Pipeline using KFP are as follows:
Step 1 : Defining functions
The function should be defined in such a way that every library which is being used should be imported.
Step 2: Passing data between components
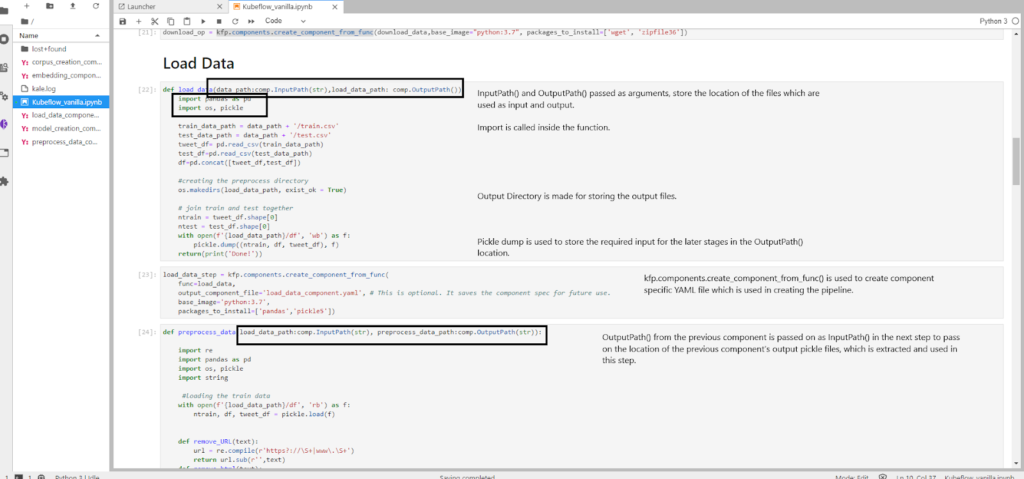
The best way to pass big data files is to use KFP components such as InputPath() and OutputPath() which store the location of the input and output files (generally we use this for big files such as CSV or TEXT files).
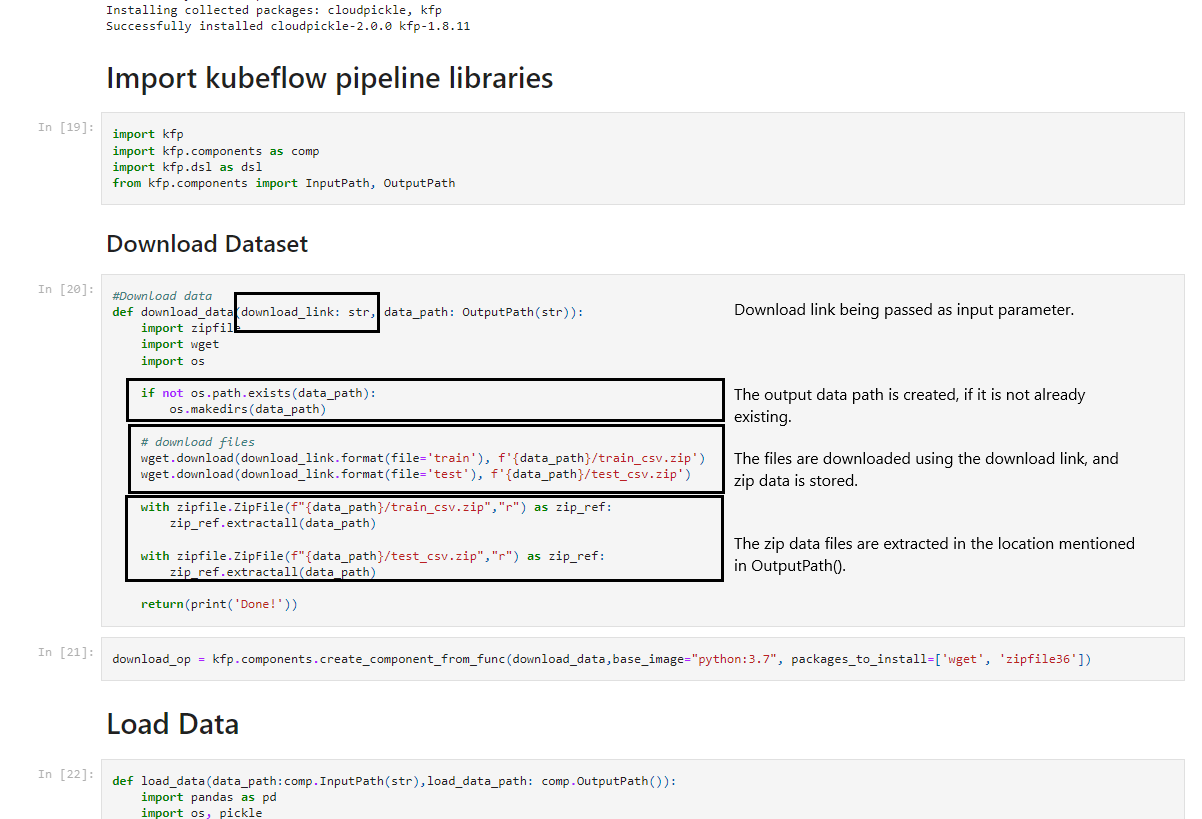
- To download the initial data we’ll pass a URL
- We’ll then use the URL in a function
- Next, we’ll store the output as a pickle file in the location and save the location’s name in the
OutputPath()type variable - This location’s name variable is then passed as
InputPath()to the next component and then we extract the contents of the pickle file and use it
This cycle of using data, storing it in a pickle file and passing the location of the pickle file as input to the next step is used again and again, to pass big data files between steps.
Step 3 : Converting the functions into components
In order to convert functions into components we will use:
kfp.components.create_component_from_func()
This function takes mainly three arguments.
- The name of the function which is to be converted into a component
- The list of packages to be installed as a list under the argument name as
packages_to_install=[] output_component_filewhich is defined by us as a .yaml file.
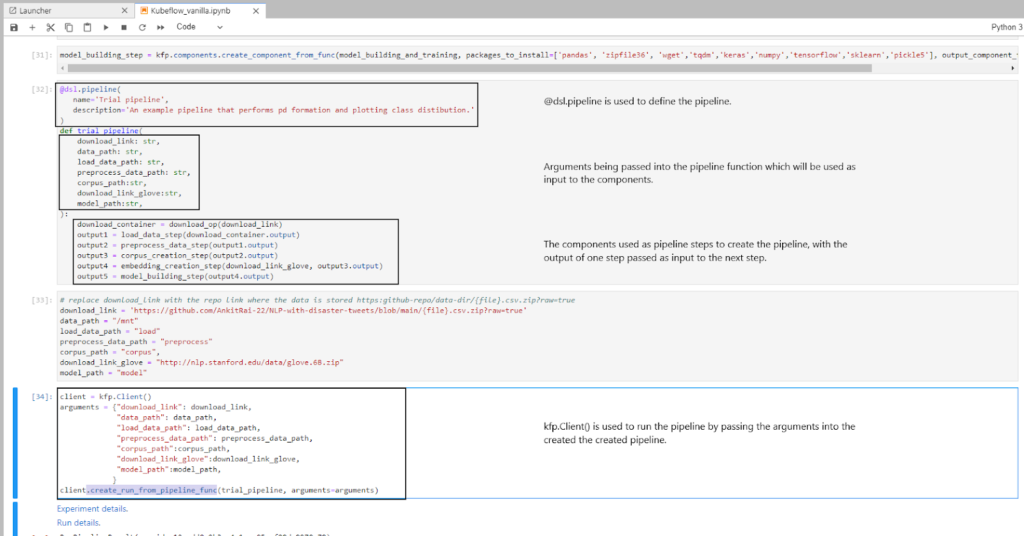
Step 4 : Defining the pipeline function
We are now ready to define the pipeline using @dsl.pipeline. We add a name and description, then define a function for this pipeline. The function has arguments passed on, which are used as input to the components created earlier. We then pass the output of one component as an input argument to the next component.
Step 5 : Running the pipeline
To run the pipeline we use kfp.Client() and create an object of the class. We then use the create_run_from_pipeline_func function to run the pipeline by passing it the name of the pipeline and the arguments which are required as input.
To run the trial notebook execute the following commands:
- Go to the Kubeflow dashboard and on the left panel click on Notebooks.
- Click on the + New Notebook button on the top right and create a notebook by giving it a name.
- Change the workspace volume from 5 GB to 50 GB, and change the requested memory to 6 GB.
- After the notebook setup is done, click on the Connect button next to the notebook you just created. It will automatically take you to the JupyterLab UI.
- Inside of the JupyterLab launcher, start a new terminal session to clone the GitHub repo. In the terminal enter the following command:
$ git clone https://github.com/kubeflow/examples
- After successfully cloning the repo, open up the examples/natural-language-processing-with-disaster-tweets-kaggle-competition directory
- Open the notebook named “natural-language-processing-with-disaster-tweets-kfp.ipynb”
- To run this notebook, click on the restart the whole kernel and re-run the whole notebook button (the “fast-forward” icon) in the top menu of the notebook
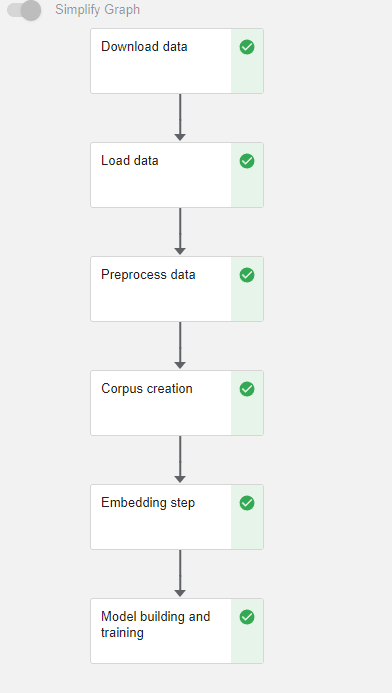
- View
run detailsimmediately after submitting the pipeline
Is There an Easier Way to Create a Kubeflow Pipeline?
You bet! If you want to automate most of the steps illustrated in the previous example, then we recommend making use of the open source JupyterLab extension called Kale. Kale is built right into Kubeflow as Service and provides a simple UI for defining Kubeflow Pipelines directly from your JupyterLab notebook, without the need to change a single line of code, or build and push Docker images. In this next example, we’ll show you just how easy it is.
Understanding Kale Tags
With Kale you annotate cells (which are logical groupings of code) inside your Jupyter notebook with tags. These tags tell Kubeflow how to interpret the code contained in the cell, what dependencies exist and what functionality is required to execute the cell.
Prepare the environment
- Launch a Notebook server
- Bump the workspace volume to 60 GB and the memory to 12 GB
- Open up a terminal session
- Clone the
kubeflow/examplesGitHub repo
git clone https://github.com/kubeflow/examples
- Navigate into the following directory:
examples/natural-language-processing-with-disaster-tweets-kaggle-competition
- Open the
natural-language-processing-with-disaster-tweets-kale.ipynbnotebook
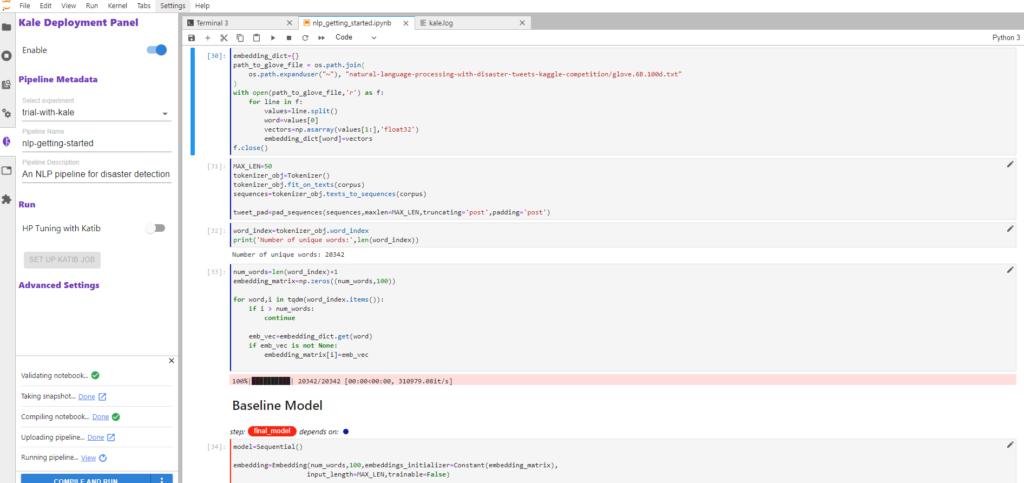
Step 1: Annotate the notebook with Kale tags
- In the left-hand sidebar of your notebook, click on the Kale logo and enable it
- After enabling Kale, give the pipeline a name and description
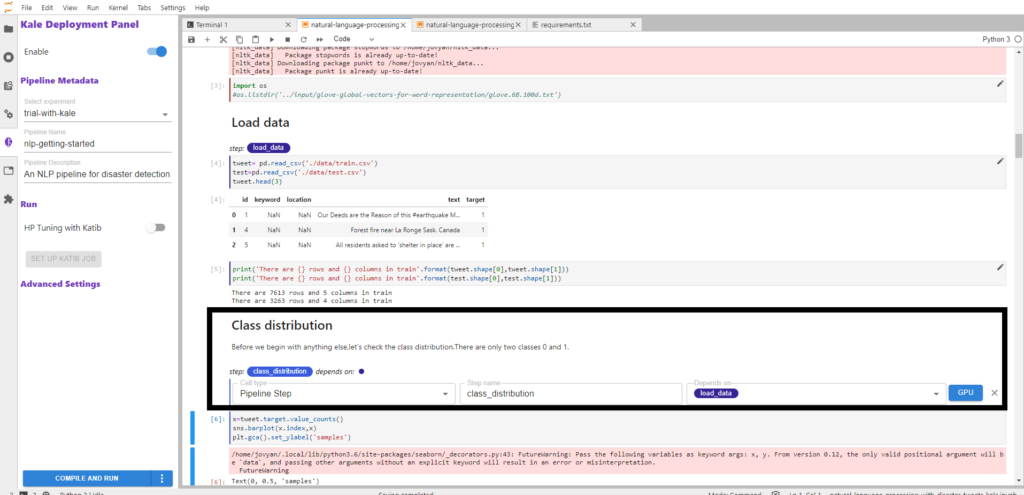
- Next, click on the edit button on the right-hand side of each code block and select the cell-type for the cell, add a name to the cell and select the name of the pipeline step it depends on
- Select pipeline_step from cell-type for all pipeline steps and select skip as cell-type for cells which you want to skip in the pipeline
- Note: To make sure the pipeline works perfectly, don’t forget to add the name of the component on which it depends
For example, in the screenshot below we annotate the code block with class_distribution and specify that it depends on the load_data step.
Here’s the complete list of annotations for the notebook along with the steps on which they are dependent on:
| Notebook Tag | Annotation Used | Step Dependency |
| Importing Libraries | imports | N/A |
| Load data | load_data | N/A |
| Exploratory Data Analysis of tweets | eda_data | load_data |
| Data Cleaning | preprocess_data | eda_data |
| Corpus Creation | corpus_creation | preprocess_data |
| Embedding Step | embedding_step | corpus_creation |
| Baseline Model | final_model | embedding_step |
| Training Model | train_model | final_model |
Step 2: Run the Kubeflow Pipeline
Once you’ve tagged your notebook:
- Install the necessary Python packages
pip install --user -r requirements.txt
- Restart the notebook kernel when prompted in the output
- Apply the “Skip Cell” annotation to the Python packages install section we just ran
Now click on the Compile and Run button in the Kale widget. Kale will perform the following tasks for you:
- Validate the notebook
- Take a snapshot
- Compile the notebook
- Upload the pipeline
- Run the pipeline
In the Running pipeline output, click on the View hyperlink. This will take you directly to the runtime execution graph where you can watch your pipeline execute and update in real time.
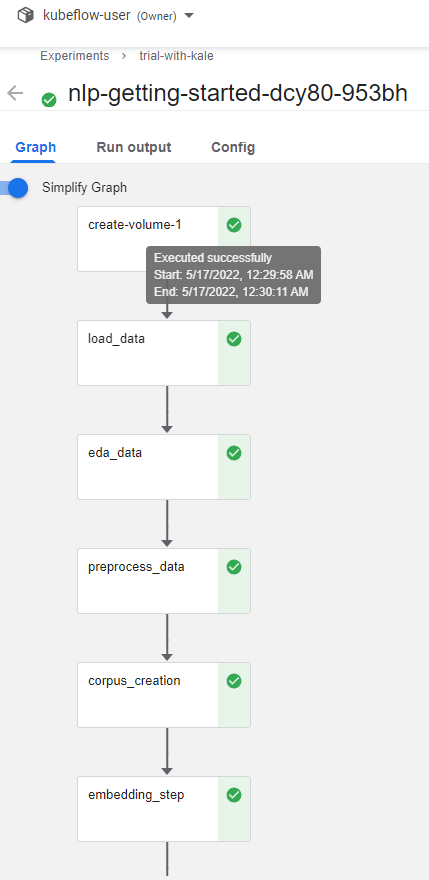
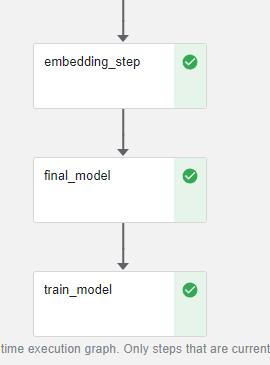
That’s it! You now have Kaggle’s NLP with Disaster Tweets competition running as a reproducible Kubeflow Pipeline with less coding and steps thanks to Kale.
By using Kale we eliminated the following steps from the previous example:
- Defining complex functions and storing inputs and outputs
- Volume creation and optimization
- Defining libraries required inside each function
- Passing data between the pipeline components
- Writing KFP DSL code to define the pipeline
You can find the data, files and notebook for this example on GitHub here.
What’s Next?
- Get started with Kubeflow in just minutes, for free. No credit card required!
- Get the code, data and notebooks used in this example on GitHub
- Try your hand at converting a Kaggle competition into a Kubeflow Pipeline